Category Archives: Reviews

Design Your Own Shirts…

The last I was here, I let you all know I would be heading to the track for the weekend, and that I had tons to do to get ready.  I shined my shoes, and then I made everybody new shirts for the occasion.  You see, I wanted us to have race-themed duds, but they don’t really make what I was looking for.  I wanted something a bit cryptic to the uninitiated.  So I set to designing something unique for each of us using Illustrator, and shopping for quality shirts for Husband and myself.

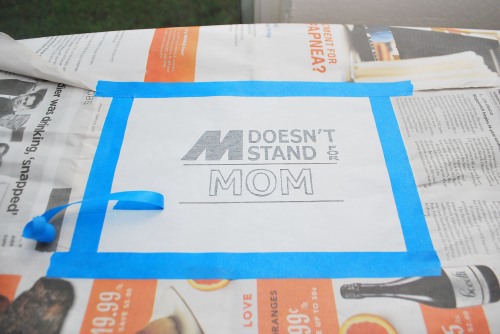
I made fabric stencils once before, when making Son’s Transformer Police costume, and since I shared in detail there, I won’t repeat all the steps here.  Instead, I’ll give you the short version.  Create your design, print your design out onto freezer paper, cut out the design, and iron it onto your fabric.

The last time, I used a puff-paint style fabric paint, that I painted on with a brush.  It worked well, but was time consuming.  So this time, while looking for paint in the fabric paint aisle, I picked up some fabric spray paint.  With that in mind, I made sure to go an extra step after ironing on my paper stencils; I masked the extra area off with news papers.

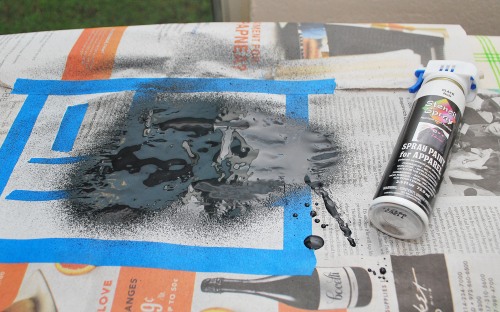
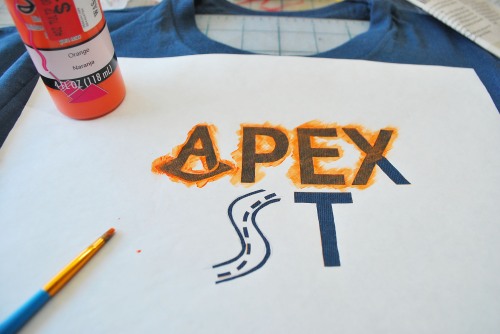
The above design was created for Son, and since I wanted it to be two colors, I needed to mask it off even more.  I taped off the areas that I wanted to spray another color, and then shot the whole thing with Stencil Spray spray paint for apparel…

The paint was incredibly thick, and over-spray went everywhere.

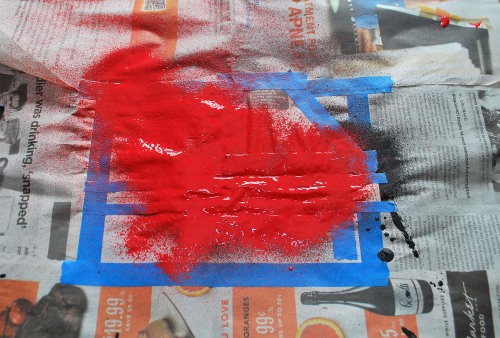
While it was drying, I went ahead and sprayed Son’s other shirt with orange paint.  And once the black paint had dried completely, I masked it off, and sprayed the stencil with a red Stencil Spray paint.

After it dried for a few hours, I pulled off the news paper masking…

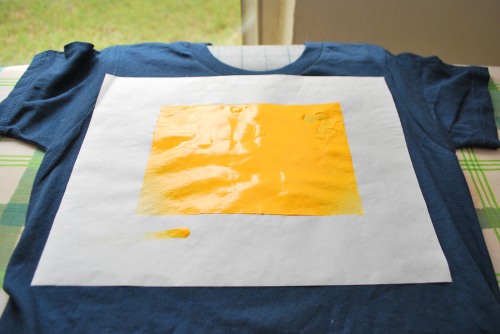
You can see in the photo above, that the paint was thick, very thick.  I was a little worried.  And then I carefully removed the freezer paper, and saw this…

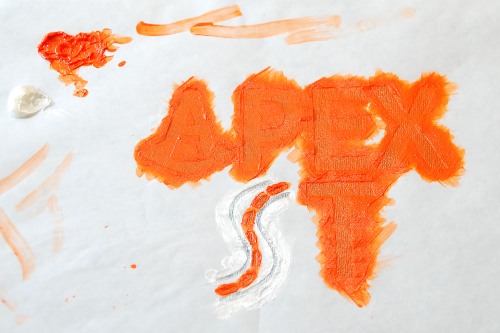
Not only was the orange too yellow, the paint looked terrible!  I couldn’t let Son go to the track in that.  So I went back to the store, bought another orange paint, in the puff-paint style, and another shirt, and tried it by hand…

That was after one coat.  Obviously, this was going to take time.  Around eight coats later, I had this…

I let the paint dry fully, and then removed the paper.

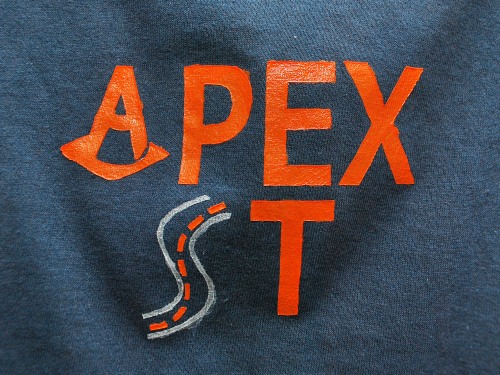
Son’s shirts were awesome.  I was so pleased.  A little about the designs…

The Apex is the tip of a curve, and the point you want to touch with your car in order to take the most efficient line through the turn.

And M is a BMW designation to separate their regular line from their sport-modified line.  Since this was a BMW event, the shirt was a huge hit.

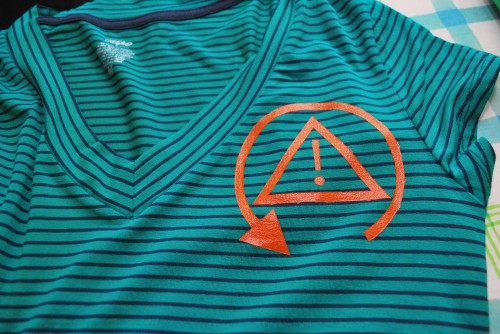
And finally, I’ll share the design from my shirt, which I also hand painted…

I decided to go with the “Traction Control” light for my shirts, placing one on the shoulder as shown, and then a larger once on the hip of another shirt.

And Husband’s shirts?  Well, his design was an M inside of a circle, which is a programming button included on all M model cars.  His shirt took a million coats of paint because I tried to go with another brand of sprayable paint, which I decided not to spray because it was worse than the Stencil Spray I used above.  Since the paint was thinner, it didn’t work as well, and I didn’t finish his shirt until 11 pm the night before.  That would be why there was no picture.

In the end, we got lots of compliments on our shirts, but no one asked for me to make them one.  I also now know NOT to use any of those spray fabric paints, and to instead just use a brush and the puff-style paints.  I’m still very happy about them.  I think they are something we may begin to wear as regular shirts, and not just Track apparel.  Yay!


3 Comments

Filed under DIY, Fashion, Reviews

Loafin’ Around…

You know, I went to High School with a guy they called Loaf, and I still think of him whenever I hear the word.  I didn’t even really know the guy.  He was a senior, and I was a freshman, and that’s all I know about him.  That, and that his best friend was a walking advertisement for Hilfiger.  Highschoolers….

But this post isn’t about him.  It’s about the good kind of loaf.  The warm, delicious, and white kind of loaf.  Really, this isn’t about a guy.  It’s about bread.

I ran out the other day, and since I’ve been meaning to make a recipe I found on, where else but, pinterest, I didn’t pick up any more at the store.  The recipe, from here, seemed pretty typical, at first…

I weighed out my flours, and gathered all my ingredients.  Since I needed 4 cups of warm milk, I cooked it on the stove.  Now normally, when making bread, you bloom the yeast before hand, and add it to your flour with the rest of the wet ingredients, but this recipe was different.  This recipe wanted me to add the yeast to the flour before hand.  Well, if you say so…

Then I added the warmed milk to the flour.  This was terrifying.  As I mentioned in my soft pretzel post, high temperatures can kill yeast, and I’m good at that.  What if my milk was too warm?  What if it killed the yeast?  I would be out of tons of flour, and milk.  I closed my eyes, held my breath, and jumped.

I stirred and stirred, slowly adding bread flour one cup at a time.  After a couple of cups, it got pretty difficult.

The recipe said to let this mess sit for 20 minutes, so I covered it, and walked away.  I got a bit distracted.  When I came back, something more like 40 minutes later, it looked like this…

Hmmm.  Ok.  The next step was to stir in the salt.  Uh, yeah, right.  I put the salt on top, and then tried my best to stir, but it just wasn’t possible.  The dough was soo stiff that I could stand that spoon up in it.  I guess that would’ve been a good picture to take.  Since I was to continue adding even more flour, and I couldn’t get that salt stirred in, I took a chance, and did my own thing.  I sprinkled the counter with flour, and dumped the dough mess into it.  I hoped that as I kneaded more flour into the dough, that the salt would also mix in evenly.  I kneaded for nearly 12 full minutes, until the dough was soft, and not too sticky.  Then, I plopped the dough back into my bowl, covered it, and let it rise for and hour, until it doubled.

Once it doubled, I dumped the dough back onto the counter again…

It was huge!  The recipe is supposed to make 3 loaves.  I flattened it out, and divided it into thirds.  I folded them up, and placed two on a sheet to be frozen, and one in a parchment-slung loaf pan.

But I had a problem.  Again.  I got started late, blame a lego-filled play session, and by the time I got around to shaping my loaf for its second rise, it was 8 oclock.  My bread wasn’t getting baked that night.  So again, I veered from the recipe a bit, and put my panned loaf into the fridge.

Come morning, my dough looked like this…

The dough rose overnight, while chilling the fridge, but I knew it needed to rise a bit more, and warm up, a lot.  I pulled it out of the fridge first thing, and let it warm up for an hour and a half.  Then I placed it in my 375 degree oven, and baked it for 35 minutes.  It came out looking like this…

So it’s not as perfect as a professional loaf, but it’s what’s on the inside that counts, right?

And that was still pretty good, even with all my detours and delays.  I would recommend the website’s recipe, even if it is a bit different.  Be sure to let me know how yours turns out.


2 Comments

Filed under Cooking, Reviews

A Roll of Genius…

Husband and others scoured my Pinterest account this year, to find inspiration for my Christmas presents.  Because of this, it was one of my best Christmases, present-wise, ever.  My MIL, got me a hat and a new bag, which I will show you all later, my mother bought me my first pair of Ghinger scissors, which have made sewing sooo much easier, and Husband got me a new phone, an iPad, and one of my favorite, yet least expensive of the bunch, a paper-pod.

So what is a paper-pod?  It’s amazing.  I don’t even think it’s officially called a paper-pod, but why not?  It’s this…

That’s right, it’s a ball that holds your toilet paper.  No, not the paper you use in the bathroom, but the roll you carry around with you when your nose is running.  At first, I thought I was the only one who used toilet tissue on my nose.  I grew up in a Puffs Pluss household, but I always hated how greasy those made my nose feel, and the paper roll is so nice and compact.  But now I know that I’m not the only one in the world that appreciates that double use of a good roll of Charmin.  Here’s how it works.

The pod opens up to reveal a roller, set into a channel…

Then the paper is simply threaded up through the top.  I can’t believe I never thought of this.  Then again, the roll setting out in the open never bothered me as much as it did Husband.  Now, I can keep my roll close, without guests wonder just what it is I might need it for in the living room.

Husband bought the orb from Uncommon Goods.  They come in many other colours, and just in case you’re one of those crazies that likes the Puffs, you can use those too, although I can’t imagine why you’d want to.

Leave a comment

Filed under Home Design, Home Making, Reviews

What a Deal!

After working so hard building Son’s new bed, seen here, I felt I deserved a present.  While at the ole Home Depot, I spotted a fire pit, on sale!  I’ve been wanting one for a while, but didn’t feel like shelling out 80+ bucks for a metal bowl that I was going to light on fire.  But when I saw the simple pit at the HD selling for a mere 38ish, I pounced.  Well, I may not have pounced so much as taken Husband to see it, and get his opinion.  He liked it enough, and told me that if I wanted it, I should get it.  So I did, but not for 40 bucks.

Nope.  When I got to the register, the sales lady informed me that if I opened a Home Depot card, that I’d get $35.00 off my purchase.  Now, normally, I decline those sorts of things, but for some reason, Husband said “Do it!” and I did.  In the end, I walked out with a new fire pit, and only 4 dollars and 80 cents lighter.

As you can see, we’ve already used it, and it’s rained since, and I made a mess trying to empty the water.  It worked great, and Husband and I nearly fell asleep out there.  I think we both like it more than we imagined, and don’t worry, I’m a put it on the card, and pay it off before I even leave the register.

Leave a comment

Filed under Reviews

Finishes, but Not Finished…

All week I’ve been talking about Son’s bedroom redo.  When I left off, Husband had the bed built, but I still had to paint, stain, and carpet it.  Fun.  I started with the paint.

The only way to get a great paint job is to paint over a nice surface.  This meant that I had to use a bit of wood fill to even out some of the holes and joints, and then sand some more.  Have I mentioned how much I hate sanding?  Since I was staining some of the wood, I chose to do all my wood filling with stainable filler.  I figured there was no need to buy two different fills since you can easily paint over stainable filler, but you absolutely CAN NOT stain over non-stainable putty, so don’t even try.  Now that I think about it, why would you ever buy non-stainable filler, it really limits your options.

So I opened my can of Elmers Stainable Wood Filler, and got to work.

You’re supposed to use a putty knife, but I didn’t feel like looking for mine, so I went with an old credit card.  You probably don’t want to use an active card; the filler may not wash off, but I don’t know since I wasn’t worried about that.  I started by applying a nice sized glop to the area I wanted to fill, and then smoothed it out.

It took a couple of passes to get it where I wanted it.

The filler didn’t have to be perfectly smooth, since it would be sanded when I sanded the rest of the wood, but smoothed it out some.  Then I waited for the filler to dry, as per package instructions.  After a quick Pinterest break, I got busy sanding it all smooth as budda.  Then wiped it all down for painting.

I used the same white paint that I’ve had since we did Son’s room the first time, the same paint I’ve used in the Bathroom, Guest room, Kitchen, and Laundry room.  I swear, it’s a Mary Poppins bucket!  But I was woried about one thing:  Object that are painted with an Acrylic Latex paint, especially when glossy, tend to get sticky.  The majority of Son’s books are books from my childhood, and there was no way I was going to let them stick to some bookshelf after surviving me, my sister, and my brother.  They deserve better.  So I did some asking around.  I learned that I could simply coat the paint in a clear, latex varnish.  This would dry harder than standard latex, and protect my books, and I suppose the furniture, too.

I painted the bed box outside, and then while it dried, painted the bookshelves and back wall.  Since we opted to save space by not building a back to the bookshelves, I thought it would be best to paint the wall for continuity.

Miraculously, it only took two coats of paint to cover that red!  And once it was all dry, I covered the bed box, and the shelves with two coats of the Latex Varnish.

While all that dried, I moved on to staining.

I didn’t take any photos of the staining process, sorry, but I chose to reuse the walnut stain that we used when we designed Son’s baby-room, so really the colours didn’t change in his room at all, just the size of his furniture.   What I can tell you is that I am a rebel when it comes to staining.  I use a brush.  I paint it on like paint, and I don’t rub it off.  I hear that the rubbing helps to ensure a nice even stain job, but I’ve never used anything light, so you can’t really tell.  I did two coats of stain on the ladder and front platform support, but only one coat on the underside.  If I ever build another bed like this, I will stain the platform before I install it.  Staining over head sucks!  We let the room air out for two days before we let Son sleep in there again.  He loved camping out in the guest room, and while he did, I ordered carpet.

I decided to go with carpet tiles mostly because I was only covering a 16 square foot space.  I also wanted to be able to replace tiles if anything mysterious happened that I couldn’t get clean.  I went to  he Flor website, and perused their selections.  I had narrowed my choices down to a handful, but still couldn’t decide.  I really needed to feel them.  I checked to see if they had any stores, and behold, they had one in Dallas.  Son and I took an afternoon trip to see what they had.

When we got there, I realized it was a showroom, and not really a store.  I could feel, I could arrange, and I could buy, but I couldn’t take any home with me.  Luckily, just by buying through the showroom I was able to save 50% on shipping.  I decided to go with a full-loop pile, instead of cut which I find uncomfortable on bare skin, and a blue, grey, and black striped pattern that seemed fun, yet neutral.    I was given a few pointers on how to instal the tiles, and told that I could wash them in the sink if they got dirty!  You can’t do that with wall to wall.

We waited for what seemed like weeks, but four days later, the tiles arrived.

Son was pretty excited, and so I let him pull the tiles out of the box, and help me install them.  It was pretty simple, but I read the instructions anyway.

First we laid the tiles out to get an idea of where we needed to cut.

Since the pattern doesn’t line up perfectly, Flor suggests alternating the grain.  I thought this looked better anyway.  The tile is made with a rubber backing, essentially a whole floor in each tile, and you simply use stickers, which Flor includes, to stick the tiles to each other.  The rubber backing ensures that the tiles stay in place, so you don’t have to adhere it to the floor.  You simply stick the stickers to the corners…

lay the tile down, and stick the other tile on top.  On the outside edges, you can cut the stickers in half…

and stick them to the tiles, just like the others. (Son has mad scissor skills.)

It really is that easy.  I did have one issue, though…

a hole.  But as luck would have it, I had just enough scraps, and stickers, to take care of it.  I simply cut the carpet, cutting through the rubber side first…

(Son took that picture!) and then stuck it all in place.

If you really get close, you can see that the lines don’t quite line up, but if you’re getting that anal over somebody else’s carpet, well…. Just be happy to know that the carpet is soft, and the paint fumes have all dissipated.  We are really happy with our Flor tiles, and I would recommend them to anyone.

I know I’ve really gone all American Idol on the results, but this post is already pretty heavy.  I promise I will post them Monday.  In the meantime, Happy Weekend!

1 Comment

Filed under DIY, Home Design, Reviews, Save my Wallet, Save the Earth

New Shams…

Way back at Christmas, I gave myself a gift of new sheets, a bed spread, and a new duvet cover.  I shared it with you all, here.  And even then, I lamented the fact that I didn’t have new pillow shams.  I loved the old ones, but they were severely yellowed, and they were getting worse.  Observe…

And just in case you can’t see it…

Yep, that’s a hole.  It’s what happens when you live with boys, whether they be big or little.  Son used to put the pillow, sham and all, over his body, his head poking through the hole, and walk through the house saying, in a “deep” voice, “I’m a Pillow Zombie…”  Yeah, it was clear that I needed new ones.

So I searched the internets until I found something that I thought might work.  My old shams had a wonderful waffle texture, and a hint of what I’ll call ladder-lace.  The texture played well with the heavy texture in the bedspread, and still looked soft, and easy.  I was shopping The Company Store online site, and came across a pair of white, cotton striped shams, called Hemstitch.

Based on the picture, I thought they could work, and placed an order.  I got lucky.  They were on sale, and including shipping, I paid less than 30 bucks for them.

A week later they arrived, and I opened them up.  They were white, and new!  I sent them for a ride in my washing machine, and then put them on my old pillows.  And since I am also winterizing my bed — not to be confused with how you winterize other things, I thought I’d share again.

( Yeah, my new shams look nothing like the ones in the Company Store photo.)  Winterizing my bed simply means putting the grey duvet cover back onto the bed, since we take it off when it’s too warm outside.

I love my bedspread still, and love my duvet cover even more.  But my new pillow shams?  Not really.  I know I should.  I agonized over them before I hit the Purchase button.  But the thing is, the cotton is thin, like boxer-shorts thin, and the stripes are flat, there is no texture.  Even in my own photo, it looks like the stripes are raised, but there aren’t.  And worse?

Yep.  That’s a black spot.  The spot appeared after I pulled the sham out of the dryer.  I don’t know how it got there, but it means I can’t return them.

Who knows, maybe I can get the spot out in the next laundry day, but even if I can’t I don’t know that it matters.  Another one will eventually show up; I do still live in a house with boys.

Leave a comment

Filed under Home Design, Home Making, Reviews

It’s Here!!!

Ok, actually, it got here Friday, just in time to really test it out.

What’s that?  You don’t know what I’m talking about?  Why my new trash can, duh!  A 200 dollar trash can, to be more exact.  Pull your jaw back up off the floor.  Really.  I know it’s a splurge, but let me show you why I went for it.

The can is made by Simple Human, and although I initially balked on price, I did love the style.  It is stylish, and our can sits out in the open, so it’s nice to have trash can with some pizzazz.

The reviews on Simple Human’s website were also top notch, and the reviewers that did complain about something were responded to by Simple Human themselves, the company, not a simple human — I’m giving them the benefit of the doubt on this one.

Also, Simple human was the only company to make a trash can that held two, yes I said two bins inside of one neat unit.  You see, Husband had been after me for months, maybe even a year, to do something about the recyclables pile on the counter.  Since we only had one trash can, I would neatly stack the glasses, cans, ect, on an unusable part of the counter, next to the microwave.  Sometimes the pile would get a little out of hand, but at least I was recycling, which is more than I can say for Husband who always put his cans and bottles into the trash instead of walking the 5 extra feet to the neatly-stacked recyclables pile.  Now he has no excuse!  The recyclables and the trash are side by side, and even in the same container.  So if you really think about it, I got a two for one deal on the thing, and it was cheaper than a marriage ref.

So for my actual review…


Simple Human sent along more than just the trash can.  Really.  It came with goodies!

That’s trash bags for each side — Simple Human is known for their custom-sized bags, but once I run out, I’ll give generic ones a go— two charcoal filters to keep the trash can smelling fresh, and then another jumbo package of trash bags.  To be honest, I never had a problem with our trash smelling, and if it did, we took it out, but then again, we didn’t have a tidy little lid for our trash can either, so maybe it just aired out, or maybe it was one of those pig things… you know, about how they can’t smell their own stink?  I can tell you now that there is odor inside the trash can, but since I’ve never had a lidded trash can, I can’t really tell you if the filter is working or not.

The designers at Simple Human clearly put some thought into the trash can.  The step you use to open the lid is silent, and it closes silently as well thanks to a little piston hidden inside.  There is also a little red switch you can engage to keep the lid open for bag changing, ect.  And as for changing the bag?  Well, they didn’t forget that part of trash can life, either.  There’s a little perch inside to rest the can on while taking out, and putting in new bags.

The one thing that I was really worried about though, was size.  Our old can was huge.  I mean, we used the big ole black garbage bags, not the little white ones.  The Simple Human can is a mere baby by comparison.  It’s caused me to really think about what I put into the trash can.  If it’s large, then I just have Son take it outside — the joys of having kids, right?  But to my surprise, we still haven’t filled up the trash side of the can.  The recyclables side is nearly full, though I don’t know if that’s because we’re recycling more, or if that’s just how it would look when my neat stack is all piled together.

We’re very happy with the new Simple Human trash/recycler.  The only thing I would change is adding the fingerprint-less feature to the lid and the step, instead of just the sides of the can.  And just so you know, I did remove the GIANT sticker from the outside.


Leave a comment

Filed under Home Design, Musings, Organization, Reviews