Category Archives: Fashion

Design Your Own Shirts…

The last I was here, I let you all know I would be heading to the track for the weekend, and that I had tons to do to get ready.  I shined my shoes, and then I made everybody new shirts for the occasion.  You see, I wanted us to have race-themed duds, but they don’t really make what I was looking for.  I wanted something a bit cryptic to the uninitiated.  So I set to designing something unique for each of us using Illustrator, and shopping for quality shirts for Husband and myself.

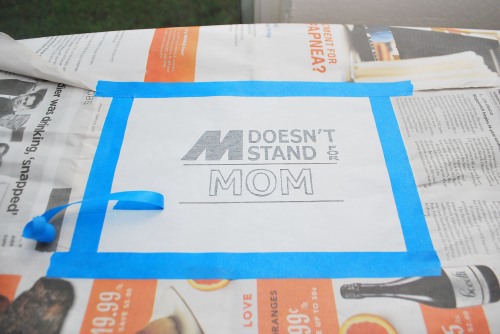
I made fabric stencils once before, when making Son’s Transformer Police costume, and since I shared in detail there, I won’t repeat all the steps here.  Instead, I’ll give you the short version.  Create your design, print your design out onto freezer paper, cut out the design, and iron it onto your fabric.

The last time, I used a puff-paint style fabric paint, that I painted on with a brush.  It worked well, but was time consuming.  So this time, while looking for paint in the fabric paint aisle, I picked up some fabric spray paint.  With that in mind, I made sure to go an extra step after ironing on my paper stencils; I masked the extra area off with news papers.

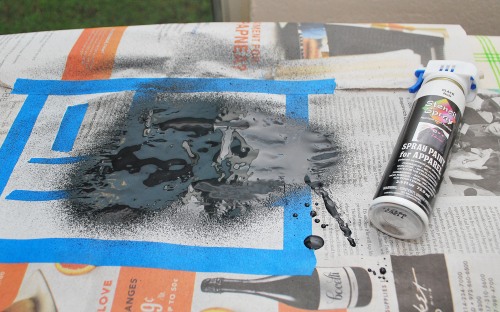
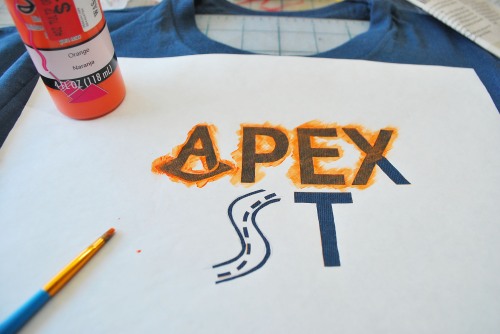
The above design was created for Son, and since I wanted it to be two colors, I needed to mask it off even more.  I taped off the areas that I wanted to spray another color, and then shot the whole thing with Stencil Spray spray paint for apparel…

The paint was incredibly thick, and over-spray went everywhere.

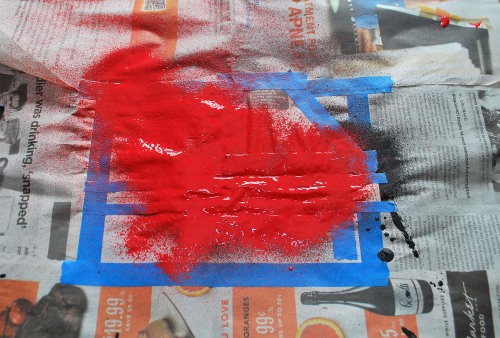
While it was drying, I went ahead and sprayed Son’s other shirt with orange paint.  And once the black paint had dried completely, I masked it off, and sprayed the stencil with a red Stencil Spray paint.

After it dried for a few hours, I pulled off the news paper masking…

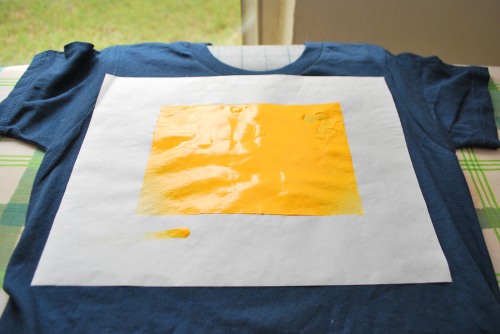
You can see in the photo above, that the paint was thick, very thick.  I was a little worried.  And then I carefully removed the freezer paper, and saw this…

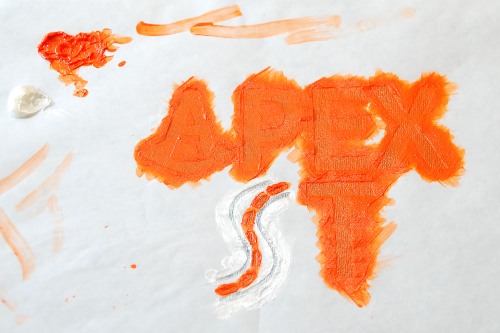
Not only was the orange too yellow, the paint looked terrible!  I couldn’t let Son go to the track in that.  So I went back to the store, bought another orange paint, in the puff-paint style, and another shirt, and tried it by hand…

That was after one coat.  Obviously, this was going to take time.  Around eight coats later, I had this…

I let the paint dry fully, and then removed the paper.

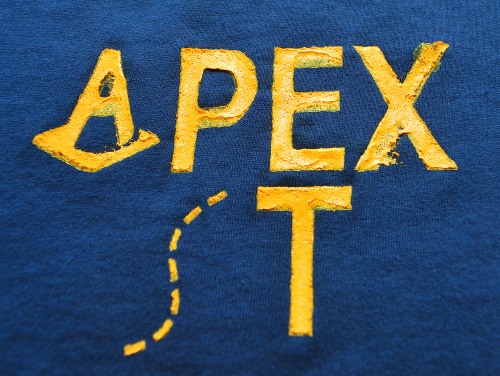
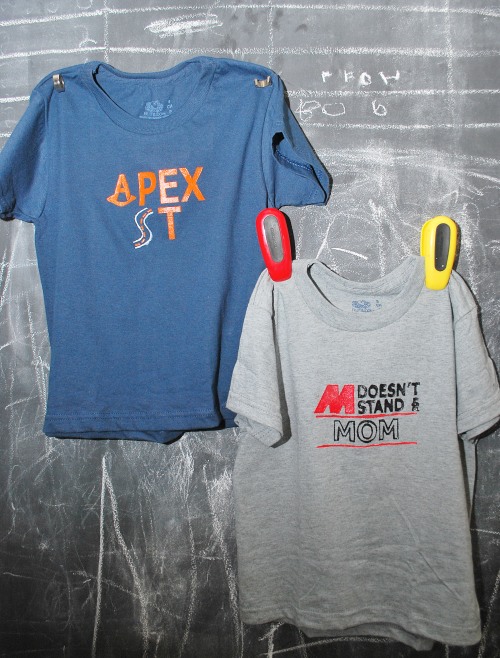
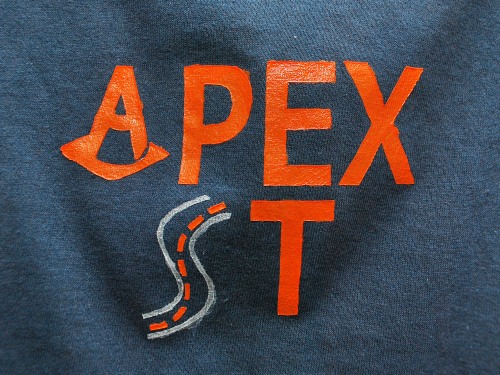
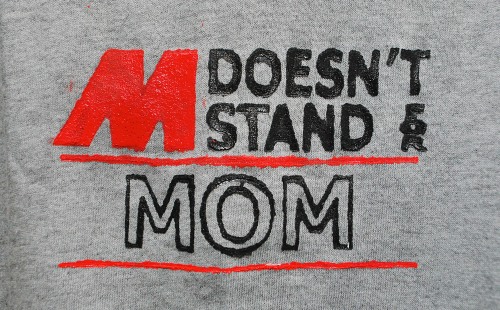
Son’s shirts were awesome.  I was so pleased.  A little about the designs…

The Apex is the tip of a curve, and the point you want to touch with your car in order to take the most efficient line through the turn.

And M is a BMW designation to separate their regular line from their sport-modified line.  Since this was a BMW event, the shirt was a huge hit.

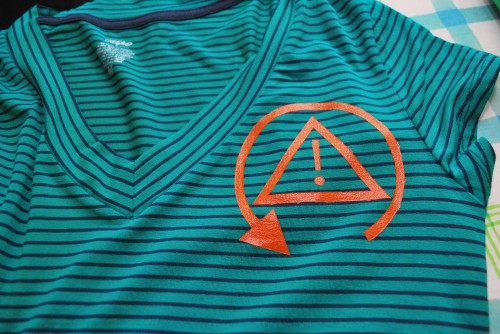
And finally, I’ll share the design from my shirt, which I also hand painted…

I decided to go with the “Traction Control” light for my shirts, placing one on the shoulder as shown, and then a larger once on the hip of another shirt.

And Husband’s shirts?  Well, his design was an M inside of a circle, which is a programming button included on all M model cars.  His shirt took a million coats of paint because I tried to go with another brand of sprayable paint, which I decided not to spray because it was worse than the Stencil Spray I used above.  Since the paint was thinner, it didn’t work as well, and I didn’t finish his shirt until 11 pm the night before.  That would be why there was no picture.

In the end, we got lots of compliments on our shirts, but no one asked for me to make them one.  I also now know NOT to use any of those spray fabric paints, and to instead just use a brush and the puff-style paints.  I’m still very happy about them.  I think they are something we may begin to wear as regular shirts, and not just Track apparel.  Yay!


3 Comments

Filed under DIY, Fashion, Reviews

Whitening Those Whites…

I get to drive around a racetrack in a few weeks.  The event is a driver’s education weekend, where you drive your own car around a roadrace track with, or without an instructor, depending on your skill level.  Since I have only done this once, five years ago, I will have an instructor, but I like it that way.  This will also be Son’s first time at a race track, and I’ve been pretty busy getting things ready.  Of course, I will post those details as I finish them, but today is about the little things.  Specifically, size 6.

I’m talking about my shoes.  When driving around a racetrack, you want shoes that have thin soles, so you can feel the car through the pedal, and also to easily distinguish the pedals.  Real racers have special driving shoes that are thin-soled and fire-proof.  I am not a real racer, and so I don’t have anything that fancy.  I do, however, have a pair of thin-soled shoes that I use instead.  They are a pair of Geox that husband bought me on our honeymoon because I kept tripping on the Roman cobblestones in my pretty espadrille wedges.  At the time, the shoes didn’t go with anything I brought, but I love them now.  The only problem, was that I bought them white, and now, well, now they weren’t exactly sparkling.  Not to worry, I had a plan.

In the past, I’ve shown you how I freshen shoes, and how to polish boots, but I haven’t shown you what to do with sneakers, and if you’ve been waiting for that bit of information, then today is your lucky day.  First, I’ll show you my shoes…

Remember, that’s five years worth of grime and scuffs on those toes.  The first step is to clean the shoes with a rag and soap; I used Mean Green …

See how much whiter they are already?  But no amount of soap is going get rid of those scratches and scuffs.  For that, you will need this…

That’s a bottle of leather whitener.  Basically, it’s white paint/polish for leather.  Just follow the instructions on the bottle, and apply it evenly to the shoes; I didn’t even bother to remove the laces…

For my shoes, it took a few coats, but in the end, the difference is astonishing…

I’m really glad I was able to revive my shoes.  They’re broken in nicely, and as much as I like shoe shopping, I have yet to see Geox for sale in the U.S. so they are irreplaceable.  All it cost me was around three bucks for the whitener, and about 20 minutes.  Now I can really shine at the track, and I’m sure I’ll be faster.

1 Comment

Filed under DIY, Fashion, Save my Wallet, Save the Earth

Puttin’ On the Shine…

Winter is boot season, and even though Winter pretty much left town weeks ago — it was 80 here the other day, I’ve still been wearing my boots.  So it goes without being said that my boots were looking a bit, well, worn.

Even worse, one of the boots has some odd bleached spots.  No, I have no idea where they came from.

But, since I grew up in Texas, and have watched both grandfathers and my own dad fixing up their dress boots before some big event, I knew just what to do.  I went to the store, and bought this…

Since they only had black and brown shoe polish to choose from, no variations like ox blood, I went with brown, and then I tested the color in a place where it wouldn’t be seen, like under the strap.  It matched well enough, so I went to work rubbing the polish onto a rag that I didn’t mind losing, and then rubbing it into my boots, being sure to move in a circular direction to avoid stripes and color gaps.  When I was through, my boots looked like this…

Unfortunately, those bleached spots didn’t want to accept any color!

I have no idea what I did, but short of pulling out some paint, or maybe a marker, I’m at a loss.  I may have to get used to the spots.  Besides, they add character, right?  At least that’s what I will tell myself.  Luckily, everywhere else looks good, and my boots look more like fashion statements, and less like work boots.  I gave up my steel toes long ago.

Leave a comment

Filed under DIY, Fashion

Custom Converse…

Months ago, while trawling Pinterest, I came across this bag, which I loved.

It was suggested that the bag could be made from a thrifted man’s jacket, and some old belts.  I figured this was an undertaking I could handle, and simple repinned the bag, but then something happened.  I was shopping at Target, when I came across a very similar bag, already made.

It was so similar, that I added it to my wish list, and then I received it for Christmas.  Yay!  There was just one thing I didn’t like about the bag; well, six things.  I hated those rings.  I immediately decided to remove the rings, but then got scared, and simply carried the bag as-is for a few weeks.  Today, I finally got the nerve to do what I knew I should’ve done all along.

I started with this…

I just felt the rings made the bag look cheap, and not nearly as chic as it could look without the extra hardware.  So I got the pliers.  A bit of sweat, and tears later — pulling those rings apart was seriously painful on my hands, I had a pile of useless rings…

and a much more chic and stylish bag…

And just in case you can’t tell just how much better it is, here is a close-up.

I think it looks a thousand times better.  I wish I had pulled out the pliers weeks ago, when I first thought of it, instead of second-guessing myself.  You think by now I’d know just how smart I am, and listen to myself.  Now I just have to figure out what to do with that zipper pull.  Self?  Self?

Leave a comment

Filed under DIY, Fashion, Fun and Free Ideas

Trend Setter…

Yep, that’s me!  I’ve set lots of trends.  I wore plaid shirts before 2007, rolled up my blue jeans back in 2004 (mostly to keep them dry when the pavement was wet), and now, I’m dictating jewelry style.  I’m fierce.

Don’t believe me?  I have proof.  Bella stole my ring!  Ok, so I’m not a twihard, or twilighter, or whatever they call those ladies, because lets face it, there aren’t any males on Team Edward, I just happen to catch the new Twilight movie preview while watching TV the other day.  That’s when I saw it.  Right there, on Bella’s left hand, was my wedding ring, the one I designed after my Grandmother tossed the one Husband slipped on my finger.

Observe,

You only get a snippet, but it was enough to catch my eye, and say “Hey!” to the T.V.  Yeah, no one was home.  I quickly did an internet search and found this…

Ready to see mine?

It’s home made.  Here’s the story…

When Husband proposed, he gave me a simple three-stone ring…

And when we got married, he added the matching band to go with it…

creating a finished product like this…

I loved it, and wore it everyday, until I gave birth to Son in 2008 because it became too loose, and I was afraid I would lose it.  Ironic, I know.  A few months after Son was born, my Grandmother was visiting, and I decided to make strawberry shortcakes.  At the time, I had begun wearing the ring again, but with with a rubber band around my finger to keep it on.  I don’t know how many of you make shortcakes, but it can be messy, and so I took the ring off, and set it on the counter.  I’m sure it was hard to see in the flour mess, and my grandmother, whom I love dearly, and who dearly loves to clean, cleaned up the kitchen.  My grandmother is also a bit deaf, so if there was any sound to indicate there was more than flour going into the can, she didn’t hear it.

I tore the house up looking for that thing.  I moved appliances, ripped the black fabric off the bottom of the couch, everything I could do to find it.  I never did.  Really, the above story is the only plausible thing, but I really have no proof.  Just the same, I wanted something on my finger to show I was attached, and to keep down the evil stares a mother pushing a young baby with no wedding ring gets at the grocery store.  I decided to do something drastic: melt down a bracelet.  I wanted the replacement ring to still be something that Husband had given me, but he was pretty steamed that the first one was lost, and we didn’t really have the money.  I happened to have a diamond bracelet that Husband gave me while in college, and I didn’t wear it.  Why?  It often came unclasped, and it pulled on my clothes.  So as pretty as it was…

 I never wore it.    I asked Husband’s permission, and he agreed to let me melt the bracelet down, and reuse the metal and the diamonds to create a new wedding ring.  We met with a friend, who happened to be a jeweler, and together, came up with a design.  I wanted something that would give me the most bang for my buck, so to speak, and we settled on an oval set with pave diamonds, and then inset diamond bands.  He did it all for $200.

I get lots of compliments on it.  Random ladies will grab my hand and admire my ring; it’s a good thing I’m not a germaphobe.  Husband still doesn’t really like the ring, and neither of us have the same attachment to it that we did to the original one, but it’s all I have, and it will have to do until we win the lottery, although, even then, I don’t know if Husband would buy me a new one.  But back to the point…

I don’t know how execs for the Twilight series saw my ring, but it’s certainly going to be famous now.  I hope I get royalties.

Leave a comment

Filed under DIY, Fashion, Save my Wallet, Save the Earth

Happy Halloween…

We have a rule in our house, that Halloween costumes must be made.  Originally, I created this rule to hinder scary, gross, costumes (I don’t like to be scared), but it also opens the door for greater creativity.  It also means more work for me, right now.

Last year, Husband and I teamed up, and created a robot costume for Son out of a diaper box, footy-pajamas, and a helmet.  You can see it here.  Amazingly, as Halloween approached this year, Son kept asking when we were going to make his Robot Costume.  Hmmm.  I’m still not sure if he wanted to be a robot, or if he just things you’re supposed to dress as a robot on Halloween.  In either case, I explained to him that he did that last year, and he could be anything he wanted.  I gave him a month to think about it.

First, he wanted to be the “Scary Cat Man” from the Thriller video.  Yeah.  I don’t know if he meant MJ, or the creature from the beginning movie, but in either case, the challenge seemed too daunting.  Sure, it would be funny to see a 3 year old dressed in red-leather and loafers, but I didn’t want to spend that sort of money.  I simply hoped he would forget about it, and eventually, he did.

Next, he wanted to be  a tea cup, and then a clock, and then a chair.  There was quite a string of random household items, but again, I felt we could do better.  I waited.  With one week to go before the big day, I asked again.

“What do you want to be for Halloween?”

“A Transformer Police Car!”

“OK.  I think we can do that.”

And off we went to the consignment store.

For those of you not familiar with Transformers, and to an extent, this includes Son, a “Transformer Police Car” is actually the a bad, evil transformer named Rampage.  Son hasn’t seen any of the new movies, so he doesn’t know that.  What he does know is that he happens to own a small, impossible to put together, transformer police car left over from when his Daddy went through his Mustang phase.  Oh heck, I’ll just show you a picture…


You can see that I had my work cut out for me, but I wasn’t afraid.  We started by buying a long-sleeve black shirt, and then some black cotton pants, which I had to get in the girl section — apparently, boys only wear jeans and cargo pants.  Then, I created some stencils on my computer, and printed them out onto Freezer paper.

Then I began the process of cutting out all the white spaces.  After last week’s flask, me and my Xacto have become best friends.  Well, maybe more like old roomates that have seen too much of each other; it’s a love-hate sort of thing.

After the pieces were all trimmed, I carried them to the ironing board.  Here’s the magic of freezer paper…

It irons on!!  You just turn your iron to the highest, dry, setting, which for me was silk, and press away.  The plastic on the backside of  the paper melts just enough to stick to the fabric, but not enough to become permanent, or ruin your clothes.

(Yes, Husband still had the good camera hostage when I took these photos)

Once the paper was in place, I opened a bottle of metallic, white, puff paint  (they don’t seem to sell the same stuff in non-3d paint).  I used a sponge brush to paint the now black letters, trying to be careful around the edges.  It took two coats minimum to get the coverage I wanted.

Once the paint is dry, I simply pulled the paper off.  I repeated this process for a total of two Police with lines, two Police without lines, and one 643.  While all that was drying, I worked on the wheels and lightbar.

I went simple.  I used the cardboard left over from the Tossbox, cutting 4 circles, and then had Husband draw the rims.  I cut one of the rims, and then handed all four wheels to Son for painting.  I wasn’t going to make his costume completely by myself.  While his paint dried, I cut out four more circles from some mirrored paper I had on hand.  Then I very carefully attached the mirrors to the black wheels, and finished cutting out the rims.  I would have pictures of this, but as I mentioned, Husband stole the camera!

I used Velcro to attached the wheels to Son’s costume, and although the Velcro is sticky on one side, it didn’t want to stay on the clothing so well.  I ended up having to stitch it on, and I broke two needles in the process.  It was a painful time, but since I stitched nice long stitches (so I can remove them, and Son can wear the clothes later), it wasn’t a long time.

The lightbar was probably the most difficult piece of the puzzle.  I over-thought it.  Surprise!  When I finally came through, I had a skeletal frame made of cardboard with cardstock folded, and pinned over it.

I know.  It’s way more complicated than it needed to be.  It’s a sickness.

I painted it the required red and blue, stuck some black tape across the middle, and called it a day.

Oh, and I stole the good camera back.

As soon as it was all dry, I made Son put on the costume, and pose for pictures.

I hope the “let’s make dumb faces for the camera” stage doesn’t last too long.

And the best part of his costume?  It’s when he transforms.  It’s sad that you can’t actually watch the process.  Son will tense up, pull his body in, and then make sounds like metal and hydraulics while he moves his arms and legs into place.  When he’s finished, he looks like this…

Some days, he’ll crawl around the house like that, pretending to be some sort of transformer.  At least now, he has a costume so others will know what he’s doing.

I’m actually very pleased with how it all turned out.  And just in case you’re wondering, no, we didn’t save any money by doing it ourselves.  The clothes were $5.38, the paint was 4 bucks, and the freezer paper was around 4 too.  Then again, I still have paint left over, yards and yards of freezer paper, and Son can wear the clothes again later, so maybe I did come out on top.  One thing is for sure, nobody else will be dressed the same!

Happy Halloween!


Leave a comment

Filed under DIY, Fashion, Fun and Free Ideas, Save my Wallet, Save the Earth, Sewing, Toys

Hammer It Out…

While getting ready for my trip last week, I did something that I don’t usually talk about.  The subject is something ladies don’t like to talk about, hoping that if never mentioned, no one will ever notice.  The subject?

Stinky Shoes.

More specifically…

Stinky Shoes creating Stinky Feet.

I know.  It’s gross.  But I said it, and I’m hear to let you know that it can be fixed.  Really.  No matter what kind of shoe, you can kill the stink, and save your feet.  What the secret?  Come closer…

Yep.  Baking Soda.  You see, Stinky Shoes is caused by bacteria, and while we normally kill bacteria with vinegar, alcohol, or even good ole sunshine, all of these can destroy your shoes.  But baking soda can kill germs too.  It’s a base — remember chemistry class and the acid/base lecture featuring vinegar volcanoes?  Well, a base is just as deadly as an acid like vinegar, and baking soda isn’t wet.  So what do you do?

First, you forgive me for the bad photos, my camera battery was dead on the good camera.  Then, you simply sprinkle in some soda…

spread it around with your hands, making sure to get the places where the foot touches most, and into cracks where bacteria may be trying to get away…

and then you let it sit.  You can let it sit for an hour, or over night, but the longer, the better.  Just shake out the powder whenever you are ready to wear them, and you will be smell free.  At least your feet will be.  I promise.


Leave a comment

Filed under Fashion, Fun and Free Ideas, Musings, Save my Wallet, Save the Earth

Getting Ready: New(ish) Pants…

All week I have been hurrying about preparing for my trip.  I made a necklace, sewed a bag, and dyed some jeans, but my jeans weren’t the only pair of pants I was taking, and they weren’t the only pair that needed fixing.  Nope.  If you’ve been following along, with baited breath I’m sure, then you’ll remember that I laid all my clothes out before I started packing.  You will also remember a pair of white pants.  (In case you don’t, here’s a refresher)  Well I bought those pants in 2006, 2007?  I can’t remember exactly when, but it was back when flared pants were cool.  Or at least I thought they made me look good.  Now, they don’t.  Now they make be look hippy, and not in the flower child sort of way, but in the mother of a child sort of way.  Sad.

But I figured I could deflare them.  I mean why not?  I didn’t have anything to lose; I couldn’t wear the pants the way they were.  So I put them on inside out, and got to pinning.

If you decide to deflare all your flared pants, remember to put them on inside out.  Sure, you’ll look funny in the mirror, but you want your stitches to be on the inside of your pants, and not on the outside, so pinning on the inside is a must, and the easiest way to do this is to put them on inside out.

Once I had one leg pinned inside and out, I took the pants off, carefully turned them right-side out, and carefully put them back on.  Then I put my intended shoes on (always try clothes on how you intend to wear it, be it heels, boots, whatever,  it will make the clothing fall like it will when you do wear it).  The one leg looked good, so now I just had to pin the other.  In the same spots as the first.  With only two eyes and two hands.  I did my best, and then repeated the turn and try to see how I did.

I didn’t do too badly, but I wasn’t quite even.  So I called for backup.  Since my dear, sweet mother was coming to pick Son up, I asked her to help.  I put the pants back on, inside out, and she repinned them so they were even.

Then, since I had so much stuff to do, like pack and clean house, my mother, dear and sweet, basted the pants by hand.  Now basting is like a long, simple, running stitch, that if you pulled from one end, it would pull the thread completely out.  It’s the sewing you did in grade school, with the construction paper.

She chose to use a contrasting thread so it would be easy to see, and therefore remove when the pants were actually sewn.

Once basted, I flipped the pants right-side out, again, and checked them in the mirror.  Now would be the time to make any changes, since the basting stitch is simple to remove and redo.  But my pants looked good, and out came the sewing machine.

I ran a stitch from the seam of the pants down to the bottom hem, on all sides, with the pants inside out of course.  Then, I flipped the pants right-side out again and tried them back on — yes, there’s a lot of turning and trying in this process.  I broke out the iron, and ironing board, and ironed down my new seams, oh, and removed the basting stitch.  Then I thought.

Now would be the time to cut off the excess fabric, and it would also mean the no turning back point, but I was concerned.  Not so much concerned that flares would come back in, it seems they already have, but concerned the my fabric might fray.  You see, most commercially bought clothing is sewn together with a serger, and the serger sews all sorts of loops and such that keep  the fabric from fraying.  I don’t have one of those.  So I put the scissors down, and left the excess.  After all my trying on, I knew the excess didn’t get in the way, so it wasn’t a big deal.

I’m glad to have new pants.  Sorry I don’t have true before and afters, but they’re already in the suitcase.  I’m also glad that my new pants didn’t cost me a dime.


Have you ever redone a pair of pants to fit more with your current style?

Leave a comment

Filed under Fashion, Fun and Free Ideas, Musings, Save my Wallet, Save the Earth, Sewing

Getting Ready: The Packing…

As I’ve mentioned in other posts, Husband is taking me away for our anniversary.  I’ve made a necklace, a bag, and even dyed a pair of jeans.  Now I’m packing.

I’m a nervous packer, maybe even neurotic.  I’m always terrified that I will forget something, be over/under dressed, be cold or hot, or worse, just plain not look good.  It’s a vacation, and I while I want to be comfortable, I always like to dress a tad nicer than I would at home.  I feel more festive this way, I guess.  In anycase, I start planning outfits, and what I need to take, days, sometimes even weeks in advanced.  Don’t get me started on the months it took to assemble my honeymoon trousseau.  I usually start by trying on every possible outfit in my closet, and then making lists, losing lists, making more lists, crying that I have nothing to wear, and finally, getting it all wrapped up, and crammed into my suitcase.  Am I the only one that packs this way?

This is the first time that I’ve gotten to share all of this with you, and it’s kind of freeing to put it all out there.  So grab your bags, cause here we go…


When Husband first told me we were going away, and that it was to California, I pictured sandals, sun dresses, shorts, and tanks.  Then I found out we were going to Northern California, and I checked the weather.

Yeah.  That’s cold.  Don’t get me wrong, I’m not complaining.  The temps here have been above 100 degrees for 17 straight days, and with our humidity, it feels more like 108-110.  Yeah.  That’s hot, and not in the good way.  So I am looking forward the cooler temps, but it means no shorts and no sun dresses.  That means that all the outfits I had come across and pinned on pinterest, weren’t going to cut it.

So I tore through my closet, and checked what I had.  I finally decided on the following outfits, with some not fully decided on — maybe you guys can help.

For Fly-Out day…

I will be wearing same shoes for the whole trip, a nice, comfortable, canvas, peep-toe slip-on.  I was going to bring a pair of wedges, but mine look best with shorts, and no shorts means no wedges.  The weather helped to simplify my packing.

You’ll notice for colour, I will be wearing my jersey knit necklace.  It’s also  metal-detector proof.  Yay for airport ease!  Yes, I’ll still have to remove my bracelet and watch, oh, and slip off my shoes, but it should all be pretty easy for the security line.

For our first day, I can’t decide between the two following outfits…

My white pants with a brown, silky halter to show off my shoulders, a purple sweater in case I get cold, a brown belt, and antique-y gold jewelry. Or…

My white pants with a blue, not silky but not cotton, top, brown belt, gold jewelry, and no sweater because the shirt is fairly warm.  So far I’m liking the brown outfit best because the blue top reminds me too much of my Day 2 outfit…

Same white pants, but a denim shirt, brown belt, and simple turquoise bracelet.  I’m loving this outfit.  I love the casual, but still nice, look of it.  I can’t wait to wear it.

And of course, you simply must take an “out to dinner” outfit; you know, something sexy, and nice, for our anniversary dinner.  I dug through my barely worn clothes to see what I could piece together.

It’s hard to see, but I’ve chosen black pumps, a black mini-skirt, black long-line, and an old lace top that I’ve decided to wear backwards.  The top has a plunging neckline, but when I wear it the “right” way, it makes me look frumpy.  When worn backwards, it plunges in the back, cuts straight across my collar bone, and sits right across the shoulders.  I don’t know why I didn’t turn it around sooner.  I’ll be tucking it in, and wearing a belt, but I haven’t decided fully on which belt.  The black one I obviously have, but I’d love a red one for a serious pop of colour.  I have a bright blue belt, with matching shoes, but Husband hates the shoes.  Sad, really, cause I love them.  Then again, they may draw too much attention, and I secretly think that is why he doesn’t like them.

And finally, for the Fly-Home, I’m basically repeating the Fly-Out outfit, but with a different top.

But I haven’t decided if I should wear the white beads, or repeat my jersey knit one…


In case I forgot, I wrote everything down in a, you got it, a list.

You can see how simple the list makes it all look.  That’s part of why I love the list, and why I plan out everything I pack.  I am only taking 2 pairs of pants, two pairs of shoes and belts (I’d only need one each if it weren’t for dinner), and two sweaters.  That means more room in the suitcase for wine and other souvenirs, or, just wine.  I just hope nothing happens to my white pants.  Cross your fingers.


So how do you pack?  Are you borderline neurotic like me, or do you just cram your whole closet into a bag or two?  Should I stick with the brown top outfit?  Should I go buy a red belt?  What about those white beads?

2 Comments

Filed under Fashion, Musings, Organization