Category Archives: DIY

A Happy Mother’s Day…

I hope all the moms out there had a great Mother’s Day; I sure did.  After working in the working world for a week, and trying hard to get that new routine nailed down, I got to spend Sunday relaxing.  I even had time over the weekend to do a blog project with Son.

We began with some coloring pages Son brought home from school, and since he had done such a nice job, and they were flowers, I thought they would make great Mother’s Day gifts for his grandmothers.  I asked Son to cut out his pictures, and then I broke out my cutting tools, and a cutting mat.  The only problem I had, was that I didn’t have any nice paper to mount his pictures onto.  So I recycled…

That’s right, I used some old shopping bags from Ann Taylor Loft.  The paper the bag was made of, was thick, and textured.  The only issue was the word LOFT written across it.  So I worked everything so that the drawings covered the logo.  I used a glue stick to glue the pictures to the paper, and then cut the paper to fit into an 8×10 frame.

Lastly, I asked Son what he loved about each grandmother, wrote it on the paper, and had him write his name, and the last word of each paragraph.

First, the one he did for my mother…

And the one for my Mother In Law…

Obviously, the way to a man’s heart truly is through his belly, even when he’s just a four year old boy.

I hope the grandmothers like the gifts.  They still haven’t received them…

Leave a comment

Filed under DIY, Fun and Free Ideas, Parenting, Save my Wallet, Save the Earth

Going-Away Treats…

This may be my last post for a while, if not, forever.  You see, I got a job, a real job.  An office job.  One where I have to commute an hour each way.  One where I will work 40 hours a week.  All that working time is really gonna cut into my creative project time, and so I’m just not sure how often I will be back.

My new job also means that Son has to leave his current, two days a week pre-school, and go to a full-day, everyday school.  I looked hard to find a school that should be a good fit for him, and after a week, he seems pretty happy there, but he was sad to leave his old classmates and friends behind, so his teacher suggested a going-away party.  When I asked Son what kind of cookies he would like for his party, he replied, “Peanut Butter and Jelly!”  I thought for a moment, told him that we couldn’t do peanut butter because kids can be allergic, but that I thought we could swing some sort of jelly cookie.  He agreed.

I began with my standard butter cookie dough.  You can see the recipe here

Then, I rolled it out, and using my biscuit cutters, in small and large, I cut out bases and rims…

I carefully pulled the extra dough from the bases and rims, and using a spatula, I placed the bases onto parchment paper, and pressed the rims onto the bases.

You don’t need any water, or egg wash to stick the rims to the bases; just line them up, and gently press down.

Once I had the dough portion set, I needed my jelly.  I chose to go with Pollaner’s cherry preserves, and Smucker’s black berry jam.  I spooned some jelly into each cookie, learning that I could easily add more while the cookies were in the oven, but that taking some away wasn’t as simple.

The jelly in the above pictures was a bit much.

Then I baked the cookies at 350 F for approximately 30 minutes, just until the edges started to brown.  Don’t worry.  It’s pretty hard to burn these cookies.

Once they’re done, be sure to let them cool before tearing into them.  That sugar is HOT!!!

The cookies were a hit at school, and everyone else who’s had them has rolled their eyes in ecstasy.   The cherry cookies were a bit more grown-up tasting, like cherry pie, and were best while still warm.  The blackberry cookies tasted better a day later than they did right out of the oven, and had an easier flavor.   Of course, now I wonder how other jams and jellies would taste.  Would strawberry taste like strawberry shortcake?  Would apricot taste posh and Parisian?

What would you do?

And as for the future of the blog, check back periodically, I may have something posted.  Or better yet, subscribe, and I think it will send you an email to let you know I’ve done something.  At least, that’s how I think it works.  I haven’t subscribed to my own blog.  Just the same, I hope to hear from you guys, and thank you for passing a few moments of your day on my little slice of Internet Real-estate.  It’s been something!

1 Comment

Filed under Cooking, DIY

Design Your Own Shirts…

The last I was here, I let you all know I would be heading to the track for the weekend, and that I had tons to do to get ready.  I shined my shoes, and then I made everybody new shirts for the occasion.  You see, I wanted us to have race-themed duds, but they don’t really make what I was looking for.  I wanted something a bit cryptic to the uninitiated.  So I set to designing something unique for each of us using Illustrator, and shopping for quality shirts for Husband and myself.

I made fabric stencils once before, when making Son’s Transformer Police costume, and since I shared in detail there, I won’t repeat all the steps here.  Instead, I’ll give you the short version.  Create your design, print your design out onto freezer paper, cut out the design, and iron it onto your fabric.

The last time, I used a puff-paint style fabric paint, that I painted on with a brush.  It worked well, but was time consuming.  So this time, while looking for paint in the fabric paint aisle, I picked up some fabric spray paint.  With that in mind, I made sure to go an extra step after ironing on my paper stencils; I masked the extra area off with news papers.
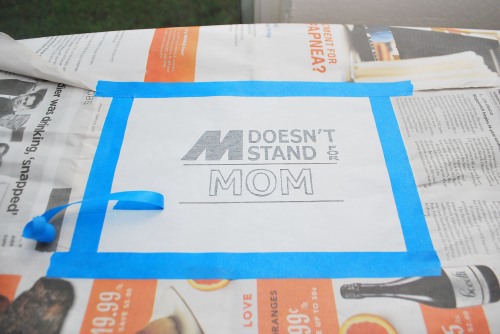
The above design was created for Son, and since I wanted it to be two colors, I needed to mask it off even more.  I taped off the areas that I wanted to spray another color, and then shot the whole thing with Stencil Spray spray paint for apparel…
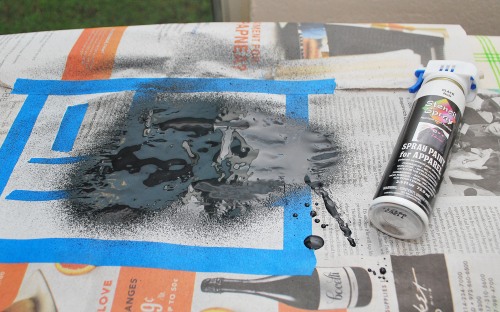
The paint was incredibly thick, and over-spray went everywhere.

While it was drying, I went ahead and sprayed Son’s other shirt with orange paint.  And once the black paint had dried completely, I masked it off, and sprayed the stencil with a red Stencil Spray paint.
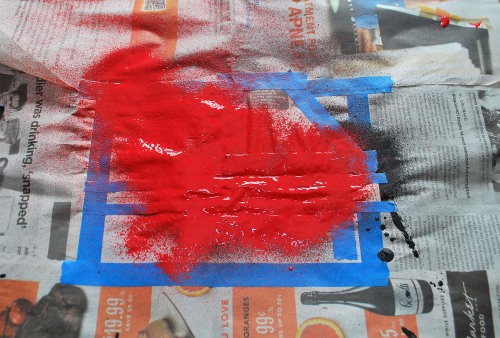
After it dried for a few hours, I pulled off the news paper masking…
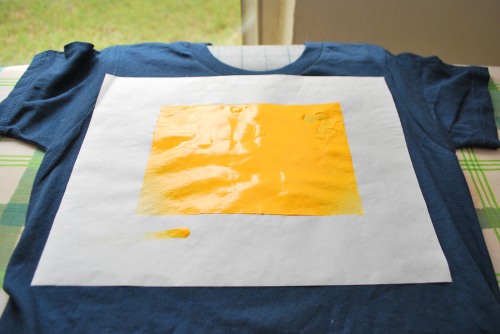
You can see in the photo above, that the paint was thick, very thick.  I was a little worried.  And then I carefully removed the freezer paper, and saw this…

Not only was the orange too yellow, the paint looked terrible!  I couldn’t let Son go to the track in that.  So I went back to the store, bought another orange paint, in the puff-paint style, and another shirt, and tried it by hand…
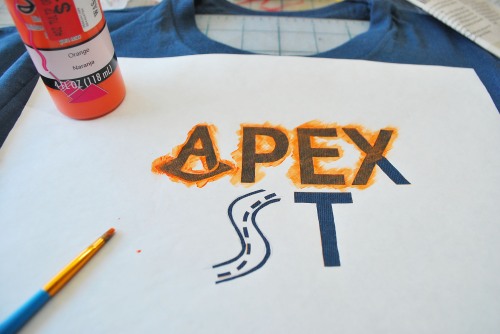
That was after one coat.  Obviously, this was going to take time.  Around eight coats later, I had this…
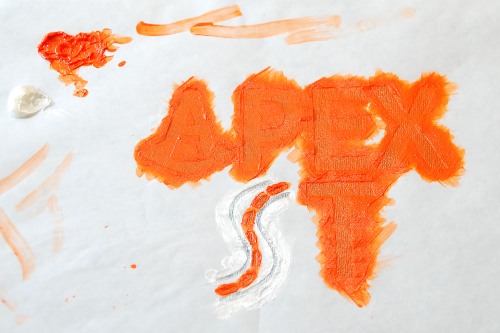
I let the paint dry fully, and then removed the paper.

Son’s shirts were awesome.  I was so pleased.  A little about the designs…

The Apex is the tip of a curve, and the point you want to touch with your car in order to take the most efficient line through the turn.

And M is a BMW designation to separate their regular line from their sport-modified line.  Since this was a BMW event, the shirt was a huge hit.

And finally, I’ll share the design from my shirt, which I also hand painted…
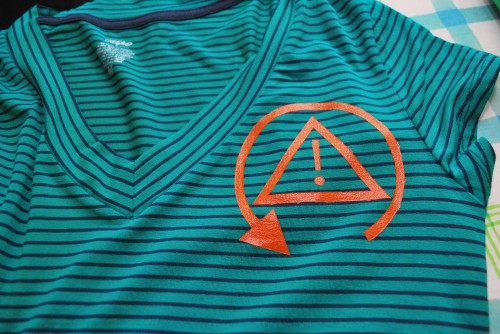
I decided to go with the “Traction Control” light for my shirts, placing one on the shoulder as shown, and then a larger once on the hip of another shirt.

And Husband’s shirts?  Well, his design was an M inside of a circle, which is a programming button included on all M model cars.  His shirt took a million coats of paint because I tried to go with another brand of sprayable paint, which I decided not to spray because it was worse than the Stencil Spray I used above.  Since the paint was thinner, it didn’t work as well, and I didn’t finish his shirt until 11 pm the night before.  That would be why there was no picture.

In the end, we got lots of compliments on our shirts, but no one asked for me to make them one.  I also now know NOT to use any of those spray fabric paints, and to instead just use a brush and the puff-style paints.  I’m still very happy about them.  I think they are something we may begin to wear as regular shirts, and not just Track apparel.  Yay!


3 Comments

Filed under DIY, Fashion, Reviews

Whitening Those Whites…

I get to drive around a racetrack in a few weeks.  The event is a driver’s education weekend, where you drive your own car around a roadrace track with, or without an instructor, depending on your skill level.  Since I have only done this once, five years ago, I will have an instructor, but I like it that way.  This will also be Son’s first time at a race track, and I’ve been pretty busy getting things ready.  Of course, I will post those details as I finish them, but today is about the little things.  Specifically, size 6.

I’m talking about my shoes.  When driving around a racetrack, you want shoes that have thin soles, so you can feel the car through the pedal, and also to easily distinguish the pedals.  Real racers have special driving shoes that are thin-soled and fire-proof.  I am not a real racer, and so I don’t have anything that fancy.  I do, however, have a pair of thin-soled shoes that I use instead.  They are a pair of Geox that husband bought me on our honeymoon because I kept tripping on the Roman cobblestones in my pretty espadrille wedges.  At the time, the shoes didn’t go with anything I brought, but I love them now.  The only problem, was that I bought them white, and now, well, now they weren’t exactly sparkling.  Not to worry, I had a plan.

In the past, I’ve shown you how I freshen shoes, and how to polish boots, but I haven’t shown you what to do with sneakers, and if you’ve been waiting for that bit of information, then today is your lucky day.  First, I’ll show you my shoes…

Remember, that’s five years worth of grime and scuffs on those toes.  The first step is to clean the shoes with a rag and soap; I used Mean Green …

See how much whiter they are already?  But no amount of soap is going get rid of those scratches and scuffs.  For that, you will need this…

That’s a bottle of leather whitener.  Basically, it’s white paint/polish for leather.  Just follow the instructions on the bottle, and apply it evenly to the shoes; I didn’t even bother to remove the laces…

For my shoes, it took a few coats, but in the end, the difference is astonishing…

I’m really glad I was able to revive my shoes.  They’re broken in nicely, and as much as I like shoe shopping, I have yet to see Geox for sale in the U.S. so they are irreplaceable.  All it cost me was around three bucks for the whitener, and about 20 minutes.  Now I can really shine at the track, and I’m sure I’ll be faster.

1 Comment

Filed under DIY, Fashion, Save my Wallet, Save the Earth

From Bags to Bedding…

Once a week, I volunteer at the local high school library.  Typically, I sort through books, and help with students, but for the last two weeks, I have been helping with a completely different mission.  The head librarian has enlisted her library aides, and myself, to work on a recycling project, turning old, plastic, shopping bags into ropes that are then crocheted into sleeping mats for the homeless population.  Observe…

First, we take the bags, and lay them out nice and flat, and cut off the bottoms and the handles…

Then, you cut the bags in half,

and then cut those halves in half…

So the short version, is that you cut the bag into fourths.

Then, you begin linking the loops together – I had a student demonstrate.

Slip one loop into another…

Then, holding both ends of the same loop, pass your right hand through the end of your left…

And pull gently, until tight…

After a while, you will have a long chain…

which I rolled into giant yarn-balls…

The one thing you will want to remember, is to try to keep similar bag sizes, and thinnesses together.  (I realize that “thinnesses isn’t a word.)  You could also get fancy, and keep your bags sorted by colour as well, so that when you crochet, you can have stripes, or other designs.  Since I don’t crochet, I can’t show you a final product on my own.  I just made the “yarn,” but I did find a video that explains what we’re doing, and may be a bit more understandable than the still images I shared.

What I really like most about this project is how it uses something that would otherwise be filling up our landfills, and polluting our oceans.  I don’t use plastic bags too often, but I know someone who has enough bags to outfit a shelter, Mom.  And if you’re one of those, at least now you have something more to do with them than packing them with dirty clothes….


8 Comments

Filed under DIY, Fun and Free Ideas, Save my Wallet, Save the Earth

One Last Stand….

As I mentioned in this post, I have given up on growing a garden.  They never seem to grow very well in my yard, whether it be because of my soil, or my thumb.  The only problem with that, is that I  really want to be able to grow my own food.  I love the idea of organic produce, but it’s so expensive!  I also love how home grown produce tastes, especially with tomatoes.  So as a last chance effort, I decided to try one more time.  But I didn’t plant a garden.  Instead, I picked up two tomato plants, some potting soil, and decided to plant my new greenery into pots.

Of course, I got Son to help me.  We put our two pots into the wagon, so that they’d be easier to manage, and filled them with some new dirt.

We then dug holes into the middle of our dirt-filled pots, to prepare them for the new tomato plants.  While I was at a farmer’s market last summer, a tomato farmer told me to always cut the lower limbs from new tomato plants, and then bury them.  He said this would create a better root system, and thus better tomatoes.  So I carefully supervised, while Son sliced of each lower branch with a pocket knife.

And as you can see in the photo above, I also typically remove most of the biodegradable pots that the plants come in.  I’ve discovered with my last two gardens, that the pots don’t degrade so well in my yard, so I remove what I can.

After we had the plants trimmed, we placed in their respective holes.

Then, it was time to surround them with new dirt.

The final step was to water each new plant, and for that, Son broke out his watering can…

Hopefully, these tomato plants will actually grow, and give me some juicy, tangy tomatoes.  The packaging said they were “Patio” tomatoes, and perfect for containers.  We’ll see.  My non-green fingers are crossed!

2 Comments

Filed under DIY, Gardening, Parenting

How to Replace a Man…


______________________________________________________________

______________________________________________________________

______________________________________________________________

______________________________________________________________

______________________________________________________________

______________________________________________________________

Ahhhhh.

F.Y.I:  That’s an oil filter wrench.  And my 4 year old took all the photos that show two hands.  I rewarded his hard work with pickles.

1 Comment

Filed under Cooking, DIY, Home Making

Dyeing For Easter…

It’s somewhat of a tradition to dye eggs for Easter.  We always did it when I was growing up, and this year, I decided it was finally time to share the fun with Son.  Since I’m a DIYer, I decided I’d come up with my own way of dyeing eggs, that, and I forgot to purchase a kit.

Obviously, the first thing you need to do is boil your eggs.  I don’t know how it happened, but I am a master egg-boiler.  Seriously.  I never have any grey on my yolks, and Son loves to eat the hard-boiled eggs plain.  So I must be awesome.

To get perfectly hard-boiled eggs, you need eggs, and a pot with a lid.  Begin by placing your eggs into your pot; I chose to do six this time.

Then fill the pot with enough water to just cover the eggs.  The more water, the longer it will take to boil.

Place the pot onto the stove, uncovered, and turn the heat on high.  Bring water to a boil, and allow it to stay there for ONE minute.

After one minute has passed, remove pot from heat, and cover.  Allow to stand for 10 – 12 minutes.

I like my eggs with a darker yellow center, so I only let mine sit for 10 minutes.  If you want them lighter yellow, but still without the grey, go for longer, but no more than 12 minutes.  Then simply drain off the water, and run cool water over your eggs.  This is where I would normally peel them, but since I wanted to dye these for Easter, I didn’t do any peeling.

To dye your own Easter Eggs, without the kit, you will need the following…

  • A bowl of hard-boiled eggs
  • Something to protect your surface
  • Vinegar
  • Food coloring
  • Enough containers for each color
  • Something to fish your eggs out with
  • Some white crayons
  • A happy, helpful kid

Fill your vessels with vinegar so that the eggs will be covered when submerged.  Then, drop food coloring into each until you have it as dark as you’d like.

Your dye vats should look like this when you’re through…

Of course, that is assuming you used Red, Yellow, Blue, and Green.

To dye your eggs, just dip them into the vinegar.

You can use the crayon to draw designs on your eggs, and the area will remain white when the egg is dyed.  The longer you let an egg sit in the dye, the brighter the color will be.  Allow the eggs to dry before hunting them.

Can you tell which ones I did?

So just in case you forgot that Easter is in TWO DAYS, and you have yet to buy your egg dyeing kit, or if you’re just too cheap to buy a kit, you now have the power to make your own.  And of course, you will also have perfectly boiled eggs for your future salads.   Yum.

Happy Easter!

7 Comments

Filed under Cooking, DIY, Fun and Free Ideas, Parenting, Save my Wallet, Save the Earth

Man Your Stations….. (and a gift!)

Er, I mean stationary?   Leave me alone about my terrible title, or no gift for you.

A few days ago, I suddenly needed to write a note to the moms of Son’s classmates.  There was just one problem, I don’t have any note paper.  I don’t even have a notepad, much less actual stationary.  How bad was I going to look scribbling out a message on random scratch paper like I do with my grocery lists?  I decided I couldn’t be that lame, and so I devised a plan.  I figured I could quickly draw up my own stationary design, and print it from my home printer.

So I looked through the internet for inspiration, and decided since it was spring, and since I just got to know my dandelions, I’d go with a dandelion theme.  The next step was to find an image I could work with.

Whenever I do image work on the computer, I turn to Google Image search to get me started.  I searched for dandelion, and then narrowed my search to “line drawing.”  Once I found an image I liked, I saved it, and pulled it into Illustrator.

I played with my images, and moved them around until I had them where I liked it…

Once I had my flowers in place, I drew very faint lines across my paper to divide it into quarters.  My next step was to print.  Luckily, my printer can do border-less printing.

I chose to print my new notecards onto cream colored cardstock left over from my wedding 5 years ago, since it was what I had on hand.  Then, I had to cut it.

This is why I drew the faint lines.  With them, and you can almost see them in the photo above, I knew just where to place my ruler and blade.

When I was finished, they looked like this…

Not bad for free stationary, huh?

So the gift?  I thought I’d share a PDF of my stationary file, you know, in case you have to write 9 notes to fellow moms, or something prettier for your grocery list….

Dandelion Note Cards


1 Comment

Filed under DIY, Fun and Free Ideas

Getting Down to Dirty Business…

Over the weekend, I made Husband get on board with my “Get On That Already” challenge.  He wasn’t exactly excited, but he agreed to help just the same.  So what did we get on, together?

Well, for a while, maybe even years, our guests have been subjected to a rocking good time when tending to their business.  Of course, this embarrassed me, but instead of fixing the problem correctly, whenever we’d have a party, I’d shove poker chips underneath the pot in hopes that I could shim it in place.  I think it worked, but it was temporary, so it really wasn’t a good fix.  So encouraged by this post over on Young House Love, Husband and I finally fixed it right.

Now, I would have photos of the beginning process, but Husband said he’d throttle me if I started snapping while he was on his knees in front of the toilet.  So I waited until he stepped out…

Of course, he didn’t step out until after he had turned off the water at the wall, flushed the toilet to drain the tank, plunged out the remaining water from the bowl, unbolted the toilet from the floor, and make me help him carry it outside.  Unfortunately, this wasn’t the only time he made me help.  He instructed me to head back to the bathroom, and I was greeted with this…

…And a few too many poker chips.  Gross, right?  That, my friends, is the wax ring that seals the toilet with the floor and pipe below.  My job was to grab that brass wax ring, and get it out of there.  Armed with a scraper, and a trash bag, I got busy.

Don’t let the name “wax ring” fool you.  This thing was nothing like a candle.  It was sticky, and gross.  Scraping it off was a dirty job, and it took forever.  I also had to take out the black rubber ring in the center.  This comes with many wax ring replacements, so the old one had to go.  Once I was done, it looked like this…

Sure, it’s still not pretty, but all that wax on top was gone.  I even tried to get that wax off the tile floor, but it wasn’t going anywhere, and since it would be hidden by the toilet, I decided it could stay.

The next step was to insert the new bolts, by sticking them through the larger area in the slots, and sliding them into place.  Then the new wax ring was placed onto the metal plate.

And since the toilet was out of the way, I decided to finish painting the wall…

Once everything was in place, the final step was to place the toilet back onto the ring, and bolts, and then press it firmly into place.  Then you just have to bolt it down, and reconnect the water.

Ok, so you can’t tell a difference at all, but I’m sure my guests will feel a bit more stable when they have a seat.

Leave a comment

Filed under DIY